
Elf Kit
Elf Kit Version 1
With the exception of the first day and the last day, you can do the days in whatever order works best for you. Some days are just a fun new pose for your other, other days are an activity for your child or imply doing something together as a family. Those days you may want to do on a night that is most convenient for you.
It is your choice if you want to set up a specific Elf Area in your home where your elf always appears or if you would like to move him around to different areas of your home throughout the month. Our welcome letters do say that the elves may move around the house or they may stay in one spot if they really like it. The tiny presents and tree in some of the pictures are super simple Dollar Store decorations, if you would like to set up an Elf Area quick and easy.
Day 1
On the first day, put your elf out with the letter from Santa Claus. If this is your first year with the elf, it will be a welcome letter explaining everything about the elf. If you’ve had the elf before, it will be a welcome back letter, reminding your children about how the elf works.For the adults, we do have it stated that adults know how to briefly handle the elf so that they don’t lose their magic should the elf need assistance (such as it falls over or a pet gets to it).
Day 2
Write a Letter to Santa – Prop your elf near the postcard that has “Dear Santa…” at the top. Tell your child that it looks like the elf wants them to write a letter to Santa. It can be what they’d like for Christmas, thanking him for the elf, or just wishing him a Merry Christmas.BONUS: Want a letter back from Santa? Head over to the USPS's website to find out how to receive a letter in return from Santa! Greetings from the North Pole - Letters from Santa (usps.com)
Day 3
Coffee – Prop your elf up with the miniature coffee cup in their hands or in front of them. If you want a more mischievous elf, have him set up near your coffee machine with items such as coffee grounds, sugar, and milk spilled around. Save the cup for the magic snow day!
Day 4
Boggle – The square plastic shaker with all the letters is a game commonly known as Boggle. Gentle shake it until all the letter squares are flat on the bottom. Set up with your elf to look like they’re playing. The goal of the game is to try to find as many words as possible with the letters that on top. If this is something your child can do, encourage them to try to find some words. They can shake it to get new letters and make new word combinations. If they’re too little for this game, it’s still a fun shaker toy!
Day 5
Pizza Night – Prop your elf with the gummy pizza. You can leave it in the box or take it out. Please do not put the elf in the oven! It’s not safe! If you’d like to, you also include a local take out menu from your favorite pizza place and say the elf may be suggesting you have a pizza night.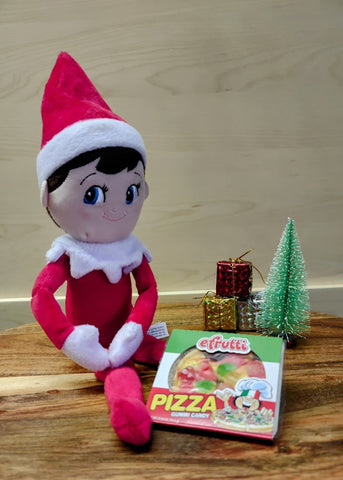
Day 6
Snowball Fight – Grab another toy and stage a snowball fight! Spread the white tinsel pompoms around the elf and the other toy. Put a pompom in each of their hands so it looks like they’ve been having a little snowball fight.If you don’t want to involve another toy, that’s fine, too! The Elf can just be playing with the little snow balls.

Day 7
Ball Pit – Open up the red and white striped cup (not the one that says popcorn). Place your elf inside. Add the little rainbow pompoms to their lap. Now it looks like they’ve been playing in a ball pit overnight!
Day 8
Duck Feeding – Setup your elf with the two rubber duckies and the bag of marshmallows (blue with a snowman on the front). Open the marshmallows and scatter them around so it looks like the elf is feeding the ducks marshmallows.This is a great one to set up either in a sink (kitchen or bathroom), in a bowl of water, or if you have an extra mischievous elf, in the toilet. Remember, don’t put the elf somewhere that he’d need to be touched to get through the day. Put the elf near the sink or toilet and the ducks inside so they can be safely removed once discovered and you can continue to use your household items!

Day 9
Magic Snow – Set up your elf either with the unopened package of Magic Snow or the dry powder poured into the small cup. Your child should add the water to the dry snow and see the magic happen. Follow the instructions on the packaging!
Day 10
Popcorn – There are a lot of options for this one but please do not put the elf in the microwave for any reason! You can setup your elf in front of your TV, with a remote, in front of a tablet, or just in the kitchen. You can pop the popcorn and use it as a prop, make it look like the elf is eating it, make a mess with the popcorn, or leave it unpopped and suggest your child makes the popcorn tonight with a movie. Your elf can be in the bucket or offering the bucket to use with the popcorn.
Day 11
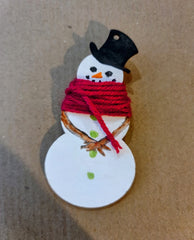
Snowman Ornament – This ornament is the perfect gift from a child to a parent or other adult loved one. Read the poem with your child and tell them that it sounds like it would make a great gift for <insert giftee, like mom, dad, grandma, etc>. In the least, you’ll need to help them unwrap the yarn scarf, cut it to the child’s height, and wrap it back around the snowman. It’s ready to gift!If you’d like to do more, you can decorate your snowman! The back is completely blank and can be decorated using the included water colors (make sure you save enough for the Gingerbread House later) or with any markers, crayons, colored pencils, etc. Writing the child’s name and the current year is a great idea!

Day 12
Decorate the House – Your child can decorate the house with the provided water colors or use their own items, if preferred, such as markers, crayons, colored pencils, etc. It can be decorated as a gingerbread house, elf house, Santa’s house, dog house, whatever your child can imagine!
Or if decorating the house isn’t your child’s cup of tea, it can be a silly project that your child caught your elf in the middle of. Or it can be both! Your elf can decorate one side (adults do the night before so it can dry) and your child can do the other side. Just make sure you’ve lined it up to the correct sides.


Day 13
Camera – Set your elf up with a miniature camera. If you look through the lens and press the shutter, it will change the landscape you see inside.

Day 14
Playing Cards – Set your elf up with the miniature playing cards. This is a full deck of real cards and can be used to play any standard card game. Go Fish is a great one for younger kids to learn to play with these cards and some grown ups!If you have a mischievous elf, grab a couple more toys and start a poker match between them. Chocolate chips make a great substitute for poker chips, if you have them available!

Day 15
Skateboard – Set up your elf with the miniature Grinch fingerboard. Maybe your elf is dangling from somewhere after flying too high with the skateboard or maybe they simply fell off of it. However you decide to set it up, it’s probably safer if your child keeps the board so the elf doesn’t get hurt. Your child can play with the board by putting their index and middle fingers on top, like legs, and pushing it around. They can do all sorts of flips and tricks with their fingers!
Day 16
Pin the Star on the Tree – Blindfold your elf with the included ribbon. Put some of the star stickers on the tree paper randomly and one in the elf’s hand so it looks as though he’s trying to get the star on top of the tree. This is a take on the classic Pin the Tail on the Donkey. There are plenty of extra star stickers if your child wants to close their eyes and try to get some stars on the tree!
Day 17
Frisbee – Set your elf up with the mini Frisbee. Innocent elves can just stop there and the kids can take it as a cute new toy. If you have a more mischievous elf, knock over lots of things around the elf or even in the whole room. Leave the frisbee on something knocked over that will be obvious for your child to find. Tell them it looks like they were playing with a frisbee all night!
Day 18
Tic Tac Toe – Set up your elf with the tic tac toe board and the X in one spot. Let your child add an O. Throughout the day, try to be sneaky and add another X when they’re not around so they come back to find that it’s their turn for another move.Alternatively, if that’s not possible then you can just set up the game for them to find and play with their friends and family.
Day 19
Elf Joke – Leave out the laminated card that has the joke “How do you spell “candy” with only two letters?”. Let your child try to figure it out! The answer is not included in case they’re the type to instantly grab the card and look for the answer. It’s a fun brain teaser!The answer: “C and Y”. Get it?
Day 20
A note from the Tooth Fairy – Your elf is also friends with the tooth fairy! Leave out the little note with a reminder from the tooth fairy to keep brushing your teeth! This is a fun one to set up in the bathroom. Just remember not to put the elf on their tooth brush so they can still use it for the day!Day 21
Make a Rainbow – Open the package of Skittles and set it up on a plate in whatever design you’d like. Your children are welcome to change the design. Add the sign “Make a rainbow! Add warm water” When your children are ready, have them pour a few ounces of warm water. You want enough that it’s touching all the Skittles but not so much that they’re floating. Then, just wait. The colors will slowly dissolve from the Skittles and in to the water.


Day 22
Christmas Bingo – A simple Christmas themed bingo game that your child can play on Christmas morning. They don’t need to get them all! Standard bingo is just get one line and they should all be generic enough that it’s pretty easy to achieve.Day 23
Reindeer Food – Set up your elf making some reindeer food. Oats and sprinkles are what is in this mix. Keep it contained or make it extra messy if that’s the kind of elf silliness you want. Hold on to it and have your child scatter it out on to the lawn on Christmas Eve for the reindeer to eat.Day 24
Nice List Certificate – Have your elf presented with your child’s official Nice List Certificate. When Santa comes later that night, your elf leaves with him and will return next year.Looking for more?
As an added bonus, your kit includes a FREE video from Santa, made using the Portable North Pole app. We are not affiliated with PNP. We are merely offering this a time savings opportunity. If you’d like additional videos for friends and family, please purchase them directly through PNP. To receive your PNP video, you must reply to our email requesting certain information and pics which are used in the creation of the video. For a demo video, see here: <demo link>Extra Child Addon – Do you have more than one child? Grab our Extra Child Addon and receive another snowman ornament, house decorating kit, nice list certificate, and FREE Santa video. If you’re worried your children won’t want to share all of the other trinkets and items, I suggest purchasing another kit entirely.
Family Activity Advent Calendar – Another great way to count down until Christmas is with all sorts of Christmas activities! Our activity advent calendar includes 30 different Christmas themed activities to do in the month of December. Take out any you are not prepared to do or start your countdown a little early. This can be used year after year and is full of generic activities to get you in the holiday spirit. It also comes with the full list as well as suggestions on how to do each activity.
Santa’s Magic Key – Do you have a home without a chimney and your child is worried about how Santa might get in? Grab a Magic Key and have your elf deliver it with the Welcome Letter or Nice Certificate. There are multiple sizes available, from just a simple key to a sign that can be hung throughout the season. On Christmas Eve, have your child hang the key outside for Santa to let himself in.
Santa Boot Print Stencils – For some added proof that Santa came, grab some stencils of Santa’s boot prints! Dust with some dirt, flour, or glitter in a path, on your welcome mat, or in front of your chimney to show Santa was here. Remember, snow will melt before the kids see it so don’t use real snow!
Cookie Tray – We have many options of cookie trays available for you to display Santa’s treats on. Don’t forget a cup of your favorite drink and a snack for the reindeer, too! Each one can be customized with your children’s names, your family name, the year, or whatever else you’d like to include on them. These also make great gifts to include if you’re giving cookies away to friends and family!